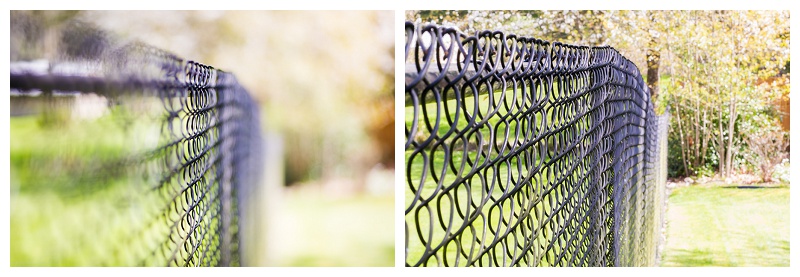
Aperture of f/1.8 Aperture of f/22
Happy Tuesday! This week’s “Photography Tip Tuesday” is the first of a three part blog series that will give you tips on creating the perfect “exposure triangle”. This is geared toward those still trying to master shooting in manual mode. The exposure triangle is made up of 3 settings: Aperture, shutter speed and ISO.
To put it simply, aperture is the opening in the lens. The aperture you choose will dictate how wide or narrow the lens opening is. Aperture is measured in “f-stops”. The lower the aperture number (f/1.8 for example) the less depth of field (portion of the image in focus) you have. The higher the aperture number (f/22 for example) the greater depth of field you have.
Looking at the two images above, I shot them with my 85mm f/1.8 lens. The image on the left was shot “wide open” at f/1.8 and you can see that only a very small portion is in focus. For the image on the right, I focused on the same part of the fence, but changed my aperture to f/22. This allowed for maximum depth of field.
A couple notes when changing aperture:
– When I changed my aperture to f/22 I was still focused on a portion of the fence very close to me. If I wanted more of the background in focus I would have focused on something further away.
– When increasing or decreasing aperture, you will also need to adjust your shutter speed and/or ISO. This is because when shooting wide open (lower number) you are letting in the maximum amount of light possible into your lens. When you shoot with a narrow aperture (higher number) you are closing off that light because the opening is smaller. You will need to make adjustments to the other two setting components to complete your exposure triangle.
Next week we will touch on shutter speed! 🙂
I hope this was helpful! As always, please let me know if there are any questions!

